A quick rewind!!
In the previous post, we implemented user creation and successfully tested it via API endpoints. In this post, we’re taking things a step further by adding key features that make our application feel more like a real social network. Here’s what we’ll explore:
- Enabling users to follow each other
- Writing expressive queries using Cypher Query Language
- Allowing users to create posts
- Adding support for likes and comments on posts
- Setting up a Vector Database for RAG (Retrieval-Augmented Generation)
- Integrating Spring AI into the backend
Let’s jump in and build out these social features step by step!
Lets follow!! 🤝
To implement the follow functionality, we’ll send a request to the backend containing the follower ID and the followee ID. The backend will then fetch both users from the database (if they exist) and establish a FOLLOWS relationship by adding the followee to the following list of the follower.
In the previous post, we already created the AppUser class, which includes a list to track followed users, as shown below:
@Node
@Data
@NoArgsConstructor
@AllArgsConstructor
public class User {
    @Id @GeneratedValue
    private Long id;
    private String name;

    @Relationship(type = "FOLLOWS", direction = Relationship.Direction.OUTGOING)
    private List<User> following = new ArrayList<>();
}
However, this list is currently not being populated with any relationships. To enable that, we’ll implement the necessary logic inside the UserService class. This logic will handle the follow action by accepting the follower and followee IDs, and it will be triggered via the corresponding controller endpoint.
So lets impement the new POST endpoint in the UserController:
    @PostMapping("/{followerId}/follow/{followeeId}")
    public Mono<AppUser> follow(@PathVariable Long followerId, @PathVariable Long followeeId) {
        return userService.followUser(followerId, followeeId);
    }
So this returns a Mono<AppUser>, which will be the updated follower user instance containing the newly added followee in their following list. Since we’re working with a reactive stack, the result is wrapped in a Mono, representing an asynchronous, non-blocking operation that will emit the updated user once the follow relationship is successfully created.
Now we will add the business logic in the UserService class.
    public Mono<AppUser> followUser(Long followerId, Long followeeId) {
        return userRepository.findById(followerId)
                .zipWith(userRepository.findById(followeeId))
                .flatMap(tuple -> {
                    AppUser follower = tuple.getT1();
                    AppUser followee = tuple.getT2();
                    follower.getFollowing().add(followee);
                    return userRepository.save(follower);
                });
    }
So, what’s happening here?
At first glance, this may look complex, but it’s actually a straightforward reactive operation:
- We first retrieve both the follower and the followee from the database using their IDs.
- The zipWith operator combines the two
Mono<AppUser>streams into one, emitting a tuple of both users once they’re fetched. - Inside the flatMap, we extract both users from the tuple.
- We then add the followee to the following list of the follower.
- Finally, we save the updated follower back to the database with the new relationship.
Don’t be intimidated by flatMap—in this case, it’s simply used to perform a transformation and chaining of asynchronous operations after fetching the two users. Think of it as a way to handle the result once both users are available.
This method returns a Mono, representing the updated follower, now with the new followee included in their following list. Since we’re in a reactive context (thanks to Spring WebFlux and Neo4j Reactive Support), the return type is asynchronous and non-blocking.
That wraps up our user-following implementation. Now, let’s move on to how users can create a post.
Lets create some posts!!🤳🎆
Now that we’ve implemented user creation and following functionality, it’s time to allow users to create posts — a core part of any social media experience.
We’ll follow a simple yet clean architecture. When a user creates a post, they hit the endpoint:
POST http://localhost:8080/posts/{userId}
with a request body that looks like this:
{
  "title": "My First Post",
  "content": "Hello World from Instagrat!"
}
Let’s walk through how this works in code.
📨 DTO
We use a record in Java to model the incoming post data:
public record PostDto(String title,String content){
}
Records are great for immutable data structures. Here, PostDto is simple and clean — it just carries the post’s title and content from the frontend to the backend.
📬 Controller
We expose an endpoint in our PostController:
@RestController
@RequestMapping("/posts")
@RequiredArgsConstructor
public class PostController {

    private final PostService postService;

    @PostMapping("/{userId}")
    Mono<Post> createPost(@PathVariable Long userId, @RequestBody PostDto postDto){
        return postService.createPost(postDto,userId);
    }
}
Here:
- We use
@PostMapping("/{userId}")to associate a post with the user who created it. - We return a
Mono<Post>— which is part of Project Reactor and represents an asynchronous operation that will eventually emit a single post (or nothing).
🧠 Business Logic (Service Layer)
we implement as below:
@RequiredArgsConstructor
@Service
public class PostService {

    private final PostRepository postRepository;


    public Mono<Post> createPost(PostDto postDto, Long userId) {

        Post post=Post.builder()
                .title(postDto.title())
                .content(postDto.content())
                .createdAt(LocalDateTime.now())
                .build();


        return postRepository.save(post)
                .flatMap(savedPost->{
                    savedPost.setPostId(savedPost.getId());
                    return postRepository.save(savedPost);
                })
                .doOnNext(saved -> System.out.println("✅ Post saved: " + saved.getId()))
                .flatMap(savedPost ->
                        postRepository.createUserPostRelation(savedPost.getPostId(), userId)
                                .then(Mono.fromRunnable(() -> System.out.println("✅ Relation created")))
                                .thenReturn(savedPost)
                );

    }
}
First, we build a Post entity and save it using postRepository.save().
- Neo4j auto-generates the internal ID, so we update postId after the first save.
- We create a relationship between the
AppUser(who made the post) and thePostvia a method in the repository. - Finally, we return the saved
Post.
🗃️ Repository Layer
Creating Relationships in Neo4j using Cypher
Here’s where things get interesting: relationships in Neo4j.
public interface PostRepository extends ReactiveNeo4jRepository<Post,Long> {

    @Query("""
            MATCH (user:AppUser {userId: $userId})
            MATCH (post:Post {postId: $postId})
            MERGE (user)-[relationship:CREATED_POST]->(post)
            ON CREATE SET
            relationship.createdAt = localdatetime(),
            relationship.updatedAt = localdatetime()
            ON MATCH SET
            relationship.updatedAt = localdatetime()
            """)
    Mono<Void> createUserPostRelation(@Param("postId") Long postId, @Param("userId") Long userId);

}
Cypher basics
What’s Going on in the Cypher Query?
Cypher is Neo4j’s query language — similar to SQL but for graph databases.
MATCH (user:AppUser {userId: $userId})
- Find a user node with the given userId.
MATCH (post:Post {postId: $postId})
- Find a post node with the given postId.
MERGE (user)-[relationship:CREATED_POST]->(post)
- If the relationship CREATED_POST doesn’t exist between this user and post, create it.
- If it already exists, reuse it.
- MERGE is like a combination of MATCH + CREATE — ensuring uniqueness.
ON CREATE SET relationship.createdAt = localdatetime(), relationship.updatedAt = localdatetime()
- Set timestamps when this relationship is created.
ON MATCH SET relationship.updatedAt = localdatetime()
- If the relationship already existed, just update the updatedAt timestamp.
Let’s fire a quick request to our endpoint and see if everything works:
╰─ curl -X POST http://localhost:8080/posts/3
  -H "Content-Type: application/json" \
  -d '{
        "title": "My First Post",
        "content": "Excited to start using this app!"
      }'
{"id":8,"postId":8,"title":"My First Post","content":"Excited to start using this app!","createdAt":"2025-07-13T17:28:18.12533"}%
🎉 Boom! We’ve successfully created a post, and we even get back the post with a timestamp. Our backend is behaving exactly as expected — post creation and the user relationship are working perfectly!
Lets Comments 💬 and likes 👍
Just like how we implemented post creation earlier, we’ll follow a simple and consistent architecture for enabling users to comment on posts. The flow is straightforward:
- The client sends a POST request with the comment content.
- We create a Comment entity from the DTO.
- Save it to the database.
- Create relationships:
- Between the user and the comment (CREATED_COMMENT)
- Between the post and the comment (HAS_COMMENT)
📬 Controller
Let’s begin with the REST endpoint http://localhost:8080/comments/{userId}/comment/{postId} that handles incoming comment requests:
@RestController
@RequestMapping("/comments")
@RequiredArgsConstructor
public class CommentController {

    private final CommentService commentService;

    @PostMapping("{userId}/comment/{postId}")
    Mono<Comment> createComment(@RequestBody CommentDto commentDto, @PathVariable Long userId, @PathVariable Long postId){
        return commentService.createComment(commentDto,userId,postId);
    }


}
📨 DTO
Here’s the CommentDto we send from the frontend:
public record CommentDto(String comment) {
}
🧠 Business Logic (Service Layer)
Now the real work happens inside the CommentService:
@Service
@RequiredArgsConstructor
public class CommentService {


    private final CommentRepository commentRepository;

    public Mono<Comment> createComment(CommentDto commentDto, Long userId, Long postId) {

        Comment comment =Comment.builder()
                .comment(commentDto.comment())
                .createdAt(LocalDateTime.now())
                .build();

        return commentRepository.save(comment)
                .flatMap(savedComment->{
                    savedComment.setCommentId(savedComment.getId());
                    return commentRepository.save(savedComment);
                })
                .doOnNext(comment1 -> System.out.println("The comment saved again with id"+comment1.getCommentId()))
                .flatMap(comment1 ->
                    commentRepository.createUserCommentRelation(comment1.getCommentId(),userId)
                                    .then(commentRepository.createPostCommentRelation(postId,comment1.getCommentId()))
                            .thenReturn(comment1)


                );

    }
}
⚠️ Why are we saving twice?
You might wonder why we save the comment twice:
- The first save creates a node in the Neo4j database and assigns it a database-generated ID (id).
- We then assign this id as commentId, which is our custom identifier used in Cypher queries.
- Finally, we save again to persist this commentId.
This might seem redundant, but it’s necessary when using both internal Neo4j IDs and custom fields for querying or relationships.
🗃️ Repository Layer
We use Cypher MERGE to create or update the relationships, just like we did earlier for posts.
public interface CommentRepository extends ReactiveNeo4jRepository<Comment,Long> {


    @Query("""
    MATCH (user:AppUser {userId: $userId})
    MATCH (comment:Comment {commentId: $commentId})
    MERGE (user)-[relationship:CREATED_COMMENT]->(comment)
    ON CREATE SET
        relationship.createdAt = localdatetime(),
        relationship.updatedAt = localdatetime()
    ON MATCH SET
        relationship.updatedAt = localdatetime()
    """)
    Mono<Void> createUserCommentRelation(@Param("commentId") Long commentId, @Param("userId") Long userId);


    @Query("""
    MATCH (post:Post {postId: $postId})
    MATCH (comment:Comment {commentId: $commentId})
    MERGE (post)-[relationship:HAS_COMMENT]->(comment)
    ON CREATE SET
        relationship.createdAt = localdatetime(),
        relationship.updatedAt = localdatetime()
    ON MATCH SET
        relationship.updatedAt = localdatetime()
    """)
    Mono<Void> createPostCommentRelation(@Param("postId") Long postId, @Param("commentId") Long commentId);
}
✅ Testing It
Let’s test this using curl for a user with ID 5 commenting on a post with ID 6:
 curl -X POST http://localhost:8080/comments/5/comment/6 \                                                                                                                                                                                                                                                               ─╯
  -H "Content-Type: application/json" \
  -d '{
        "comment": "This post is really helpful. Thanks!"
      }'
{"id":9,"commentId":9,"comment":"This post is really helpful. Thanks!","createdAt":"2025-07-13T18:30:41.960012"}%
💬 Boom! The comment was saved and linked correctly to both the user and the post.
For liking a post, we take a simpler but very practical route: We don’t need any extra information apart from the user and post IDs. So, no DTO is necessary.
Instead, we directly form a relationship in the database between the user who liked and the post that was liked.
📍 Endpoint Structure
The endpoint for liking a post looks like this:
POST http://localhost:8080/likes/{userId}/like/{postId}
This clearly conveys the action: User {userId} likes Post {postId}.
🔧 Controller
@RestController
@RequestMapping("/likes")
@RequiredArgsConstructor
public class PostLikeController {


    private final LikeService likeService;

    @PostMapping("/{userId}/like/{postId}")
    Mono<Void> likePost(@PathVariable Long userId,@PathVariable Long postId){
        return likeService.likePost(userId,postId);
    }
}
Explanation:
- We return
Mono<Void>here because we’re not returning any specific data after the like operation.- In WebFlux, returning Mono means:
- “I’m not returning a body, just letting you know the operation is asynchronous and will complete successfully or with an error.”
- It’s especially suitable for:
- Creating relationships
- Logging actions
- Sending fire-and-forget events
- The main purpose is just to perform the action (i.e., create a relationship) and let the caller know it succeeded (implicitly via
HTTP 200 OKor204 No Content).
💼 Service Layer
@Service
@RequiredArgsConstructor
public class LikeService {

    private final LikeRepository likeRepository;


    public Mono<Void> likePost(Long userId, Long postId) {
        return likeRepository.likePost(userId,postId);
    }
}
🧠 Repository (Cypher Query)
public interface LikeRepository extends ReactiveNeo4jRepository<Post,Long>{
    @Query("""
        MATCH (user:AppUser {userId: $userId})
        MATCH (post:Post {postId: $postId})
        MERGE (user)-[like:LIKES]->(post)
        ON CREATE SET
            like.createdAt = localdatetime(),
            like.updatedAt = localdatetime()
        ON MATCH SET
            like.updatedAt = localdatetime()
        """)
    Mono<Void> likePost(@Param("userId") Long userId, @Param("postId") Long postId);
}
🧪 Let’s Test it
Use this curl command to test the endpoint:
curl -X POST http://localhost:8080/likes/5/like/6
Here:
- 5 is the user ID (e.g., JohnDoe)
- 6 is the post ID (e.g., “Learn AI with Spring”)
Since the response is Mono<Void>, you won’t see a response body — that’s expected.
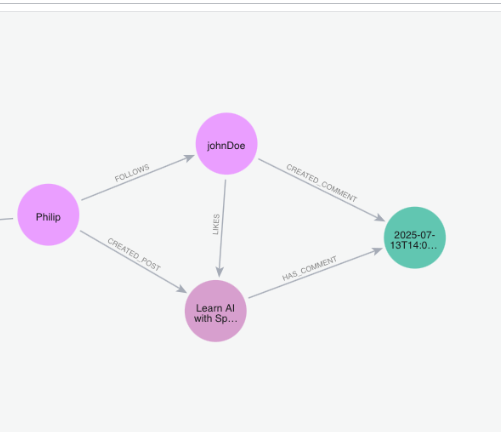
👀 View in Neo4j Browser
To verify the like operation visually, head over to: http://localhost:7474/browser/preview/
There, you’ll see a new relationship and also all the previous relations we created:
The UI is very intuitive and you can double click on expanding the nodes and relations.
✅ And that’s it! We’ve implemented all the core functionalities we set out to build.
Now it’s your turn — try adding more data to the database using the available endpoints. Remember, the more data, the more fun it gets — especially when AI comes into play later. More data means better insights, smarter recommendations, and richer social interactions.
🔍 Creating a Vector Document Store for RAG
To unlock AI-powered features—like smart recommendations, semantic search, or contextual chat—we need a way for our app to retrieve relevant content efficiently. This is where Retrieval-Augmented Generation (RAG) comes in.
🧠 What Is RAG? Why Vectors?
RAG combines large language models (LLMs) with external knowledge sources. Instead of relying only on the model’s built-in knowledge, RAG retrieves up-to-date, domain-specific information (posts, comments, docs) and uses it to generate more accurate responses.
- Traditional search: Relies on keywords.
- Vector search: Finds semantically similar text—searching by meaning, not just words!
This works by converting documents into high-dimensional vectors (embeddings). At query time, we use similarity search to find the most relevant content.
Example: Searching for “How to build a graph database?” will return posts about Neo4j, Cypher, and Spring Data—even if those exact words aren’t used.
📦 How Do We Store Vectors?
We need a Vector Store—a database optimized for storing and querying embeddings.
☁️ Cloud Option: Pinecone
Pinecone is a fully managed, serverless vector database. It’s ideal for modern AI apps because:
- Scalable & fast: Handles millions of vectors with low latency.
- Easy integration: Works with OpenAI, LangChain, and LLMs.
- Real-time updates: Supports filtering and hybrid search.
- Free tier: Great for experimentation.
We’ll use Pinecone to store vector embeddings for our posts, comments, or user bios—powering semantic search and AI features.
💻 Local/Self-Hosted Alternatives
Prefer running locally? Try these open-source options:
| Tool | Highlights |
|---|---|
| FAISS | Facebook AI Similarity Search—lightweight, fast, perfect for local dev/testing. |
| Chroma | Simple, open-source, built for RAG and LLM pipelines. |
| Weaviate | Scalable engine with GraphQL-like queries, hybrid search, and metadata filtering. |
| Qdrant | Rust-based, high-performance, supports advanced filtering—great for production. |
All of these work well with LangChain, Haystack, and other LLM frameworks. Most can be spun up quickly via Docker.
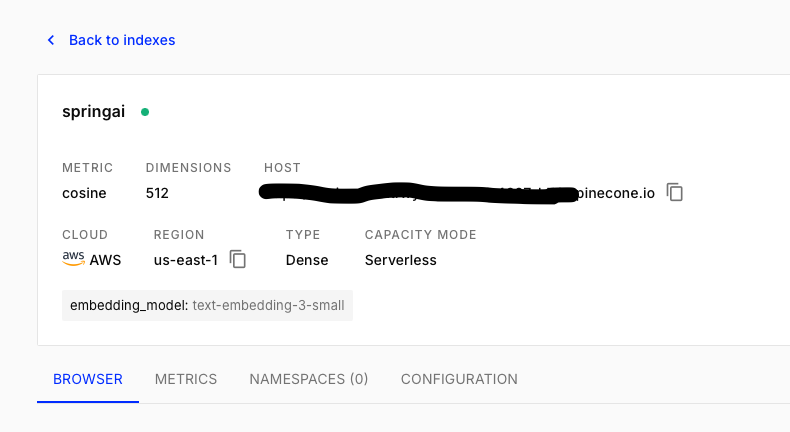
🔧 Setting Up Pinecone: Index, Environment, and Embedding Model
After signing up for Pinecone, you’ll create a new index—your vector storage container.
Configuration options:
- Index Name: For example,
springai - Metric: Use cosine distance (ideal for semantic similarity)
- Dimension: Set according to your embedding model (see below)
- Pods: Default is fine for prototyping
🧬 Choosing the Right Embedding Model
When integrating Pinecone with OpenAI, selecting the right embedding model is crucial. OpenAI now recommends text-embedding-3-small:
- Smaller & faster: Lower cost, quicker responses
- High performance: Excellent semantic search
- Vector dimension: Returns vectors of size 1536
Tip:
When creating your Pinecone index, set dimension = 1536 to match the output of text-embedding-3-small.
🌐 Connecting Your App
Your Pinecone host URL (e.g., https://<your-index>.svc.<region>.pinecone.io) contains your environment and project details.
Keep your API keys and host URLs private—never share them publicly.
You’ll use these credentials to initialize Pinecone clients in your backend application.
Once compleated creating index, you will have something like this:
Conclusion
🚦 Wrapping Up (Finally 😅)
Whew! If you’ve made it this far — hats off 🧢 to you. This post is already clocking in at over 10+ minutes of reading, and we’ve covered a lot:
- Built a basic social media backend with Neo4j and Spring WebFlux
- Implemented core features like post creation, comments, and likes
- Connected the dots for vector storage using Pinecone and OpenAI embeddings
I initially planned to introduce Spring AI here too… but that would turn this post into a mini eBook! So, let’s hit pause for now and leave that for the next chapter. If you’re curious, check out the Spring AI documentation for a sneak peek at what’s coming next.
🚀 What’s Next?
In the next post, we’ll roll up our sleeves and build our own “poor man’s GROK”— we will name it BROK 😄.
BROK will be your social smart assistant, designed to:
- 🧠 Contextually surface posts from people you follow – not just by date, but by meaning and relevance
- 🔍 Leverage our Pinecone-backed vector database to perform semantic, AI-powered searches over content
- 🧱 Establish the foundation for RAG-driven social intelligence – where retrieval meets generation
- 💬 Enable smart Q&A based on your network’s activity – let the bot answer what your friends are talking about
Thanks for following along! 🚀
Keep experimenting, building, and sharing your progress. So, I’ll wrap up this blog here. We’ve covered quite a bit today! You can find all the code for this part here 👉 github.
The next part of this series will be available as soon as it’s ready. Stay tuned — it’s coming soon!

Happy coding! 🧑💻✨